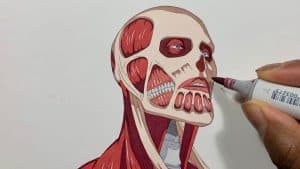
How To Draw Colossal Titan with this how-to video and step-by-step drawing instructions. Easy things to draw for beginners and All.

Please see the drawing tutorial in the video below
You can refer to the simple step-by-step drawing guide below
Step 1
As usual, let’s start with some instructions. Draw the brow line and the bulk of the head into one shape. For the lower face, highlight the cheekbones, chin, and jawline. Draw a little V for the front neck muscles. Then wrap it up by drawing the rest of the neck and collarbone.
Step 2
I like to start with eyebrows, so let’s do that. Notice how the main eyebrow looks like an S-shaped angle on its side. The more you exaggerate that shape, the angrier the character will look. The wrinkles on his forehead made him look angry and menacing.
Step 3
The nose is pretty basic. This guy has very little skin on his body, so his nose and ears are the main features left to make him look like a human. Wrinkles around the nostrils add to the expression of anger.
Step 4
You want to draw little eyes on this guy. Almost too small. Keep them squinting a little.
Step 5
Next, we will draw the outline of the head and the open shapes of the skull around the eyes and on one side of the head.
Step 6
Strangely, this guy still has his lips, even lost most of his skin. The exaggerated gaping expression here will help us really show off our teeth later on. Give him a big bottom lip, as there’s nothing but muscle underneath.
Step 7
Here we will draw the chin, jaw and ears. We can also start drawing some skin that extends around the face and hooks under the jaw, near the corner of the mouth.
Step 8
The main item here is the open shape on the cheek area. Once we’re done drawing, we can go in and start adding details to the head and face. Wrap some creases around the head to show the shape of the skull. Draw stretch marks on the bands of skin and tendons between those openings.
Step 9
Now we can start adding teeth. Normal people’s teeth don’t look like this. The characters in Attack on Titan are extremely stylized. Although some details are not anatomically correct, they are eye-catching and add uniqueness to the designs. Start with the top row. Make sure the teeth are aligned between the front and side faces. Let’s add some shade around the eyes, and also add the jaw muscles near the ears.
Step 10
Now he’s really starting to look familiar. Lower teeth receding. Draw some vertical wrinkles on the lower lip, and add some stretchy skin below the lip. That’s where the leather will end. Shape the upper lip a little more and add shadows below the nose. The cheekbones are covered in exposed muscle, so draw vertical wrinkles to show the muscle fibers.
Step 11
Next, draw muscle detail on the chin and side of the head. We can add some details to the ears and the ribbon on the skin.
Step 12
We start. If you’ve never drawn gums before, look in the mirror or just feel around your teeth and gums with your tongue so you can visualize what you need to draw. These gums are exaggerated and stylized, but the basic shapes are grounded in reality. Try to add weight to the lines near the top and bottom skin bands to create shadows.
Step 13
Here we will go back and enhance the shadow using small dashed lines.
Step 14
With the head done, I’ll increase the speed through the neck and torso. For a more detailed look at how to draw a muscular human body, check out my tutorial on How to Draw Muscles. Here I have outlined all the major muscle shapes.
Step 15
While it’s not entirely necessary to draw this much detail on the muscle… it does work that way in the drawing. At this stage, I’m mostly concerned with shadows in the shallow areas of the neck. On the left side, the trapezoid radius seems small compared to the opposite side. That’s just the camera angle we’re using. Make sure to point out some of the larger muscle fibers.
Step 16
You can see I have gained a lot of weight in the shadows under my jaw and chin. Having the upper and lower dashes end too close together gives that muscle a shiny and reflective look. Block in larger muscle sections with thick curves. Then start adding dashes or “slashes” to shape the muscle fibers. You only have to go as detailed as you want, but try to keep it even throughout the drawing.
Step 17
Use thick shadow areas to show the overall shape of each muscle part. Open areas with thinner lines receive more light than recesses at the end of the muscles. Here’s an example of it being more about what you DON’T draw than what you DO… What do I mean? If you try to draw a long line for each muscle fiber, the picture will become messy. It will be flat and you will lose all distinct shapes. Plus, a few curves will ruin whatever effect you’re trying to achieve. By only actually drawing the ends of the muscles as they come together and form shadows, the viewer’s brain automatically fills in the texture. So HINT only at the texture, instead of drawing them all. Oh, I should have started with that.
Step 18
The shoulders are closer to us than the rest of the body, and the arms are even closer to us in this photo. As a result, the lines of the muscle fibers will thicken as they get closer to us, and the open spaces will also be slightly larger. Go through the drawing and add details as needed to balance things out so that you don’t have any “blank” parts of the drawing. You can always go too far with this step, so try to refrain. If you’re not sure, take a break and come back to the drawing in an hour and see how it looks. If it needs a little more detail, go ahead and add it.
Step 19
This is the final ink illustration. I did this digitally, based on a pencil sketch I scanned. You can use a drawing tablet on a computer. However, if you’re doing this on paper, this is a great time to use a brush with Indian black ink. You’ll want a hairbrush or something close to it. I recommend using Bristol paper if you are going to use liquid ink. Thin paper will wrinkle and lock, so if you can afford a Bristol you should always have it on hand. You can use a tech pen like the Sakura Pigma Microns to capture the finer details of the face and to add a better level of shading. So ok! Thanks for watching this guide! If you enjoyed the theme, please check out my other Attack on Titan drawings at https://htdraw.com Also stay tuned for more Titan tutorials here on DragoArt. (Meanwhile, Dawn is dealing with human characters. Maybe I can beat her against Reiner Braun!)

