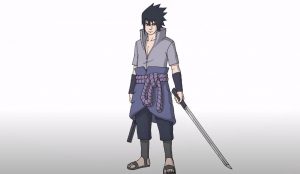
How To Draw Sasuke full Body easy with this how-to video and step-by-step drawing instructions. Anime boy drawing tutorial for beginners and everyone.

Please see the drawing tutorial in the video below
You can refer to the simple step-by-step drawing guide below
Step 1
Check out this tutorial on how to draw Sasuke from scratch as we start with his head in this first installment!
Sasuke’s eyes are mostly hidden by his messy hair that falls over his face, and we’ll start with that aspect.
His hair will have some larger spikes on the top with some smaller spikes on the bottom. Then we’ll draw the bottom of his face below his hair, and then you can use a simple line for his mouth.
Finally, use some more curves and points for the big collar he’s wearing.
Step 2 – Now, draw his shoulders and sleeves
Continuing with your Sasuke drawing, now we will add some aspects like face detail and some more on top of him. First, use some small circles along with some curves for his eyes.
Then his nose and mouth will be drawn with some small, simple lines. Then finish this step using some curves for the top of the sleeves and then draw the zipper up the front of his outfit.
Step 3 – Next draw some of his arms and rope belts
There are some details that we will add in this step of the Sasuke drawing tutorial, but just take it slow and follow the reference image and you’ll be fine!
First, use some slight curves for his arm from the sleeve down. Then we’ll draw the rope to be used as a belt for him, and this can get a little tricky!
It is drawn with a lot of curved lines that join together to create a rope effect and this is a part that can take a bit of patience. It would be worth it though!
Step 4 – Draws his sword and some other straps
So far, you’re doing great on this Sasuke drawing! Now we will draw him holding his sword. First draw his hand, then use some straight lines for the sword he’s holding.
Then draw some more of those little curves to continue drawing some more strings hanging down his waist.
Step 5 – Now draw some more of his outfits
In this step of our Sasuke drawing tutorial you will see you add the top of his legs. First, use some curves for the outfit he’s wearing below the waist and down to his legs.
Then add some straighter curves for the top half of his leg. After you’ve added the top of his legs, there will only be some final details to add in the next step before you color, so move on to step 6!
Step 6 – Add the leg rest
Let’s complete the final aspect of this Sasuke drawing by drawing the rest of his legs. Use some straight lines for his shins, and then you can finish by drawing his feet into his shoes.
That should wrap up all the steps of this tutorial, but you don’t have to go on yet! You can also add some extra details of your own to really complete this drawing.
Some ideas you can use could be to paint a cool background to give this drawing some personality.
By adding a background, you can recreate your favorite scene from the Naruto manga or anime.
You can also draw some more characters to go with him, and these are just a few of the many ideas that you can implement. How would you complete this drawing before the last step?
Step 7 – Finish your drawing of Sasuke with some color
This is the final step of this Sasuke drawing tutorial, and in this section we’ll perfect it by adding some color.
In our reference image, we used Sasuke’s typical color palette in the anime. That means we’ll be using some light gray and blue for his outfit and some black for his hair.
You can use our reference image as a guide if you want to keep the colors accurate to his usual look, but you can also use some of your own.
Once you know what colors you like, you are free to choose the art mediums and tools that you will choose to bring them to life. We can’t wait to see what you choose!


