How to Draw Perspective easy with this how-to video and step-by-step drawing instructions. Easy drawing tutorial for beginners and everyone.
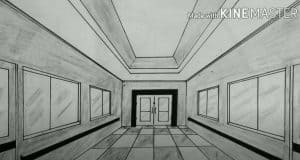
Please see the drawing tutorial in the video below
You can refer to the simple step-by-step drawing guide below
Step 1
First, describe the merging lines at a disappearing point. In our image, the top lines are the top edges of the houses and the bottom lines are the bottom edges of the houses and the lines on the sidewalk.
Step 2
Now use a few vertical lines to describe the boundaries of the houses. Drawingforall.net’s team recommends drawing without a ruler to practice your ability to draw straight lines.
Step 3
Use the same vertical lines depicting the doors and windows in the foreground. Recall that according to the law of the aerial perspective, details in the foreground must be darker and more contrasting.
Step 4
In exactly the same way as in the previous stage, describe the rest of the doors and windows. As these elements move further, they get smaller and lighter.
Step 5
Using a lot of lines, describe the tiles as shown in pictures from the artists of Drawingforall.net. While working with this area, try to make sure that the bricks become smaller and lighter as they move away from us.
Step 6
Add a few lines to the sidewalk to give them volume. Describe the houses in the center of the layout. They should be very light and not very detailed.
Step 7
Now let’s move on to the right half of the street. Use merged long lines at the vanishing point created to represent masonry. In the same stage, describe the door in front.
Step 8
Remove all the build lines and make the foreground darker and more contrasting. Add the finishing steps needed to make the artwork clean and complete. You can add some drop shadow or color to make the artwork more massive and convincing.


