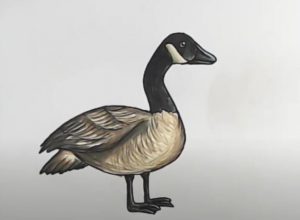
How to Draw Geese Easy with this how-to video and step-by-step drawing instructions. Easy animals to draw for beginners and kids.

Please see the drawing tutorial in the video below
You can refer to the simple step-by-step drawing guide below
Step 1 – Sketch the head and back
First, locate the head and body of the goose. Draw a small circle for the goose’s head. Then draw a large oval for the body of the bird.
Step 2 – Draw the gooseneck
Combine the head and body of the goose with two parallel lines to indicate the position of the neck. Notice how the neck bends and slightly tilts the head.
Step 3 – Draw the Beak of the Goose
Now let’s move on to the mine. Draw a pointed triangle and place it on the right side of the circle of the head. Then draw an uneven line between the beak and the head.
Step 4 – Draw eyes and nostrils
Draw the eyes in the upper part of the head using a small circle. Then draw a clear line along the bird’s beak. This line will mark the length of the mouth. Then, above the mouth line, draw a small line – this will be the goose’s nostrils.
Step 5 – View body details
Draw a line under the body in a semicircle. This will add volume to the goose drawing. Using short lines draw the tail of the goose.
Step 6 – Draw Wings
First of all, draw the outer contours of the wings with a long, smooth line. To make the wings more realistic, add feather lines.
Step 7 – Draw the goose’s legs
To draw the legs, use parallel vertical lines. On the left leg, sketch a small process, and just below the thickening. Try to repeat the shape of the legs as close as possible.
Step 8 – Draw the paws of the goose
Let’s continue drawing the legs. Draw lines parallel to the goose’s body to form the contours of the feet. Draw steady feet and long toes.
Step 9 – Add Some Feathers
Draw feathers on the lower body and front wings. Our goose feathers look like triangles. Arrange the feathers in a row and let them follow each other.
Step 10 – Remove the rule
Remove excess lines from the goose drawing. Erase the original part of the oval. Make the silhouette of the bird more clear and harmonious. Alternatively, you can trace your goose drawing with darker lines. Prepare the goose shapes to color.
Step 11 – Color the goose drawing
It’s time to draw our bird. Use white with cream shades as the main color. Paint the beak and nails in a dark yellow or light brown color. Add soft shadows to the bottom line of the torso and neck.
That’s the end of the tutorial to draw the goose. Now we know what stages the image of a goose consists of. We truly believe that you have received the knowledge you deserve and will be able to supplement your collection with a new drawing! Write to us about how quickly you coped with this lesson and we will prepare a new one for you!


