How To Draw Anubis easy with this how-to video and step-by-step drawing instructions. Easy things to draw for beginners and everyone.

Please see the drawing tutorial in the video below
You can refer to the simple step-by-step drawing guide below
Step 1
As we mentioned in the introduction to this Anubis drawing tutorial, this one features the head of a dog. That’s what we’ll start with in this first step.
There’s a lot of detail in Anubis’ head and face, so this is a step where you might want to try and replicate exactly how the head looks like in our example image.
The face is rather angular and the eyes are drawn in a way that gives Anubis a rather serious expression.
He has very pointed ears, and then will have some curves on the side of his head, almost making it look like a cobra’s hat.
Add a few details to the neck and then you’re ready for step 2!
Step 2 – Draw the chest and shoulders for Anubis
We will begin drawing the shoulders and chest for your Anubis drawing in this second step.
First, we’ll add some contouring detail to the ‘hood’ of his face, and along the rim where his head connects to his body. Once you’ve added these details, you can start drawing his shoulders and arms.
We will use some curved lines to draw his shoulders and chest muscles, as shown in the reference image.
Finally for this step you can use some more of these circles to draw his muscular biceps attached to his shoulders. You can also draw the sides of his chest using some more curved lines.
Step 3 – Next, draw the remaining details of his arms and chest
You started the arms in the previous step of this Anubis tutorial, and in this step we’ll finish them off along with some more details.
Extend his arms with some shorter curves, and then we’ll draw the bracelets he’s wearing. The bracelets will be quite large and detailed, and they extend outward into a pointed end, as shown in our reference image.
You can then draw his hands using some curved lines, and his fingers will be quite long and angled with sharp nails at the tips of them.
Once you’ve completed the arms, we’ll then extend his chest and belly down deeper. Also, draw lots of curves inside this area to give them muscle.
Step 4 – Now draw some more clothes for Anubis
For the design of this Anubis drawing, he is seen wearing an elaborately designed dress.
That’s what we’ll be drawing in this step and you can start by drawing the icon that acts as a lanyard for him. This will be connected to some straps which you can draw with some diagonal curves.
Then we’ll draw a long, thin piece of fabric with lots of detail dropping down from the icon.
Finish this section using some curves for the sides of the skirt, and then you’ll be ready for the final details in the next section.
Step 5 – Add some final details to your Anubis drawing
Before you color this deity, we must first complete the final details in this step of the Anubis drawing tutorial.
The last part to draw will be his legs. Like the other parts of his body, they will be quite thin and muscular, and they can be drawn with some long and rounded lines.
Like his hands, his feet will have several long toes with sharp claws at their ends. Once you’ve drawn these legs, you’re ready for the final step!
Before you move on to that final step, make sure to add any additional details or background elements you might like to your drawing.
Step 6 – Finish your Anubis drawing with some colors
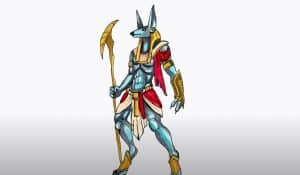
Now we will complete your Anubis drawing by adding some color to it. Anubis has a variety of visual interpretations, so you have a lot of freedom with how you can color him.
We kept the color scheme rather muted for our example image. That means we used dark gray for his body, then we used some dark yellow and blue for his clothes and head.
These are the colors we used, so while you can use similar colors if you like them, you should also use any color you like for the picture.
What color and artistic medium will you use to finish this god of death?
Your Anubis drawing is done!
You’ve completed all six steps of this Anubis tutorial, and we hope you’re proud of the picture you’ve finished!
This is a pretty detailed drawing, so we tried to make it easier for you by breaking it down into smaller steps for you to follow.
Don’t hesitate to add your own details, color choices or art mediums! This is your drawing, so it’s your turn to show off your creativity.
Completing this guide is just the beginning, as we have plenty more for you to enjoy on the site


