How to Draw Anime Clothes easy with this how-to video and step-by-step drawing instructions. Anime drawing tutorial for beginners and everyone.
Please see the drawing tutorial in the video below
You can refer to the simple step-by-step drawing guide below
Step 1
In the first step of the tutorial on how to draw anime clothes, we will start with the top outline of the outfit. To do this, we will use lots of straight and curved lines to create this vertex.
The arms of the upper part will be quite long and flowery, as shown in the reference image. The neck of the top will then connect together in a way that makes it look like one side overlaps the other.
Step 2 – Draw some details for the anime clothes chest
You have already started sketching your anime clothes drawing in the first step, and in this step we will add some details to the chest.
There will be a large band around the waist, and this is what we are going to start drawing right now. You can start this by drawing a horizontal line near the chest of the garment.
After that, there will be a thin string tied around to secure it to the body. You can also add some simple line details on top for more detail.
Step 3 – Next you can start the bottom half of the outfit
The top half of these anime suits are pretty much done, so next we’ll start drawing the bottom.
To start our tutorial on how to draw anime clothes, simply draw two slightly raised lines from the band around the waist.
They will form the outline of the bottom of the garment, as shown in our reference image.
We will then finish this step by adding some lines down from the waist like a strap, and these lines will help give the impression of creases in the fabric.
Step 4 – Draw the base of the anime clothes
We’ll be finishing the bottom half of your anime clothes drawing in this fourth step. To do this, we will stretch several straight lines down the fabric of the skirt part of the garment, and they will be of different lengths.
This way you will form some angled shapes at the bottom. These lines will also help give the picture a more rumpled look. Once you’ve finished this bottom half, you’re ready for some final details!
Step 5 – Now you can add some final details
You have pretty much done with the clothes in your drawing, and in this step of the how to draw anime clothes tutorial we will draw the person wearing them.
We draw a simple head with some jagged lines for the facial hair. Then we drew some feet in sandals to complete it. This is how we chose to finish this drawing, but you can also put your own spin on it if you want!
You can change the details of the face and can make it look like your favorite anime character. Or you can go even further and design your own unique character! Once you’ve finished designing your character, you can also create a background for the drawing.
Again, you can use your favorite anime as inspiration and recreate your favorite anime scene. You can also create a unique setting to display this character’s location.
What additional details and elements will you use to complete this image before the final step?
Step 6 – Finish your anime clothes drawing with some colors
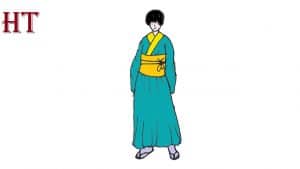
The sixth and final step in how to draw your anime clothes is the step where you can start over and have some great fun colors in your painting! We’ve shown you a palette that you can try in our reference image.
We used green and yellow for the clothes in this example, but this is just one option you can use. Anime characters are usually bright and colorful, so you can freely choose how to color in this picture.
This is a great opportunity to break out all your favorite colors and patterns to bring this image to life! You can also achieve the types of colors you want by choosing the right mediums.
Tools like acrylic paints, crayons, and markers will work well in creating the kinds of colors you’ll see in anime.
On the other hand, a softer look with mediums like acrylic paint and crayons would also look great. We can’t wait to see how you end up with this drawing tutorial!
Your Anime clothes drawing is done!
With your final details and elements added and your colors added, that means you’re done with this anime clothes drawing tutorial!
This tutorial was created to break this drawing down into more manageable steps to make it easier and more enjoyable for you.
Now you have everything you need to create your own anime characters or recreate your favorites from the animes you love! Make sure to unleash your creativity and have a lot of fun with your drawings. We can’t wait to see what you come up with!


