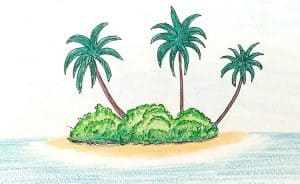
How To Draw An Island by pencil with this how-to video and step-by-step drawing instructions. Landscape drawing for beginners and kids.
Please see the drawing tutorial in the video below
You can refer to the simple step-by-step drawing guide below
Step 1
We’ll start this tutorial on how to draw an island not with the island itself, but actually with the water surrounding it.
This is a step you can change up a bit if you want, as we will only be drawing a small portion of the vast ocean the island is in.
You can make this stretch of ocean larger or smaller depending on your own preference. To draw it, we will then use some curves and circles for the stretch of the ocean, and it will have two curves.
Remember to leave some space at the top of it, as this is where we will draw the island later.
Once satisfied with how it looks, you’re ready to move on!
Step 2 – Next, start drawing some features for the island
You’ve drawn the lines for the ocean, and in the next step of your island drawing, you can start drawing some features for it.
When you think of this type of island, you probably think of palm trees and beaches, so it seemed fitting that we would feature a palm tree as the first feature!
To do this, use two closely spaced curves for the winding trunk. Then we’ll paint some large palm leaves on it, and they’ll have smooth lines for the top and more jagged lines for the bottom.
There will also be some circles for some coconuts under the leaves.
Finally, use some bumpy lines to create a grassy base for the plants, then move on to step 3!
Step 3 – Draw some more features for the island
Now that you have drawn a tree for the island, you will find it much easier to draw some more trees in this step of our how to draw an island tutorial!
Just add another of these brushes and it will look a lot like the first one you drew.
To finish off this step we will then add a rock feature behind the trees, which will be drawn with some more rounded, slightly jagged lines.
There will be some space left, as we will be adding more features in the next few steps.
Step 4 – Now draw some more land for the island
As we begin to finalize the details for your island drawing, we will now add some more land to the island. For this land, we will draw a sandy beach background with grass on top.
To do this, use a curved line for the top of the island, and then use some wavy lines for the bottom of the grass. Then use some slightly curvier and smoother lines for the bottom of the grass.
You can also add smaller details like some rocks at the bottom of the sand section. Once these aspects are drawn, we can move on to some final details in the next step.
Step 5 – Complete your island drawing
Before long, you’ll be able to bring a little tropical vibe into your paintings, but first, we have some final details to add to this step of our how to draw an island tutorial!
To do this, first draw another brush on the right hand side of the island. Again, this tree will look very similar to the others, so it shouldn’t be much of a challenge!
Finally, you can add another rock to the scene, and then finish with some small details for all the parts you drew.
Before moving on to the final step, you can also add some highlights of your own. Maybe there is a volcano on the island, or you can draw some huts and cottages.
These are just a few suggestions, but this tutorial is all about creating your perfect island, so make sure to let your imagination run wild!
Step 6 – Complete your island drawing with some colors
Now, you have come to the final step of your island drawing. We used a lovely cool color palette for our example image, with lots of pleasant blues, greens and browns to create a relaxing feel.
You can give a similar look to your painting, but you can also make it much brighter and more vibrant if you like! The medium you choose can have a big impact on how it looks.
Acrylic paint and crayons would be ideal for a brighter look, while watercolors and crayons would be great for a similar look to our image.
What colors and mediums do you think would suit this picture best?
