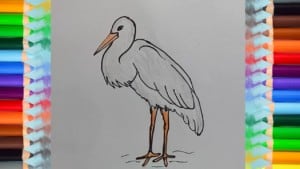
How to Draw a Stork step by step for kids with this how-to video and step-by-step drawing instructions. Easy animals to draw for children and everyone.

Please see the drawing tutorial in the video below
Step 1
Let’s start with the head. Draw a curved line like a letter C with another smaller curved line inside of it.
Step 2
Next, draw the beak. Storks have very long and very thin beaks. Draw a triangle with a long line going through the middle.
Step 3
Now draw the neck. Like the beak, the neck is also very long and thin, making the stork look tall.
Step 4
Next is the body. Draw two long, slightly curved lines and leave the bottom part open.
Step 5
Now give your stork a little detail by drawing the wing. The wing is very wide and long and covers most of the body. The stork’s wide wings are used to help it soar through the air when it flies to conserve energy. Add two shorter lines near the bottom to separate the different parts of the wing.
Step 6
Then draw the bottom part of the stork. Make a small hump for the beginning of the leg.
Step 7
Draw the first leg. The leg is very long and thin, even thinner than the beak. The stork has webbed toes on its foot.
Step 8
Draw the stork’s legs with the standing posture. Finish the stork by painting in white and gray.


