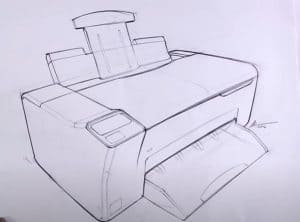
How to Draw a Printer Easy with this how-to video and step-by-step drawing instructions. Easy drawing tutorial for beginners and kids.

The “Electronics” category on our website is becoming more and more popular every day and our readers have asked us to show us how to draw new items related to this catalog. The essence of this section is very simple, here we create very simple instructions, consisting mostly of literal element lines. And this will now be updated with this printer drawing. Like all other images from the above catalog, the printer drawing will consist of the simplest lines.
Please see the drawing tutorial in the video below
You can refer to the simple step-by-step drawing guide below
Step 1
As we said in our other articles, the artist should treat all objects as simple geometric shapes. In this example, the printer drawing in the first stage will be represented as a long cube. You can either draw the printer with a ruler or not, if you want to practice drawing straight lines.
Step 2
In the second phase, we will add basic and indispensable parts to the printer sketch. First, we create a cap on the top surface of the device. Next, on the side, we describe some buttons and a touch panel. As you can see, all the lines of the second stage are also done using simple lines.
Step 3
Now, let’s turn the long cube with buttons into something more like a printer. First of all, describe a wide opening and a protruding plate. When drawing this sheet, remember that it has to increase slightly in our direction for the drawing to have a larger volume.
Step 4
Now hold an eraser in your hand and clean up the whole picture of unnecessary extra lines. You can then add shadows to make the drawings on your device richer and more interesting. In addition, you can add some additional details to your MFP drawing.
So this four-step tutorial is over. Don’t forget the fact that in the category “Electronics” you will find so many different types of lessons.


