How to draw a cheese easy with this how-to video and step-by-step drawing instructions. Easy drawing tutorial for beginners and kids.
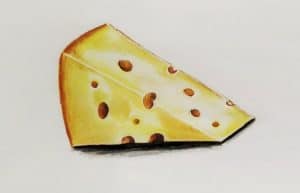
Please see the drawing tutorial in the video below
You can refer to the simple step-by-step drawing guide below
Step 1
Start outlining the cheese from a regular parallelogram – a quadrilateral with opposite sides parallel to each other. This will be one side of the cheese. By the way, we remind you that the first steps of drawing must be done with very light strokes.
Step 2
Draw a triangle at the top of the cheese parallelogram. The bottom of the triangle should be slightly rounded, like in our example. As you can see, we created the basic shapes of the cheese drawing using two simple geometric shapes.
Step 3
So it’s time to turn this geometric shape into a cheese drawing. To do this, let’s start adding holes as shown in our example. The holes in the surface of the cheese drawing must be of different sizes and in no particular order. By the way, holes are formed from cheese milk due to milk fermentation.
Step 4
Now put your pencil aside and grab an eraser. Carefully and slowly erase all construction lines, giving the drawing a clean and finished look. You can add many new holes or change their shape.
Step 5
In order for the cheese drawing to have volume and weight, you need to add some shadows. As always, you need to identify the light source first. Then, with that in mind, let’s start adding shadows. First, draw shadows in the darkest places, then gradually move to the lightest places.
It’s a cheese drawing tutorial. You can leave it black and white, like in our example, or paint it yellow as Wolverine’s outfit. We hope you enjoyed this drawing tutorial. If you like to draw food beautifully, we recommend you try our lessons on apples and donuts. Alternatively, you can place the cheese drawing next to an apple, donut, or other items you can find in our Food and Miscellaneous category to create a still life.

No Responses