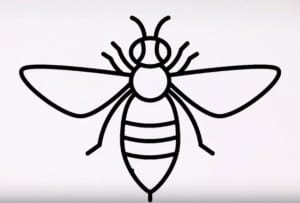
How to draw a bee easy step by step with this how-to video and step-by-step drawing instructions. Easy animals to draw for children.

Please see the drawing tutorial in the video below
You can refer to the simple step-by-step drawing guide below
Step 1
First draw a rounded rectangle for the front part (chest) of the body.
Step 2
Next draw head, eye and antenna. The head is rounded. The eyes are long oval along the sides of the head. The two antennas are thin loops drawn at angles from the top.
Step 3
Now draw the bottom part of the body. It has an elliptical shape and is twice as long as the chest. Draw segments on the body. These are lines all over the body.
Step 4
Add wings on both sides of the top part of the body. They are triangular. The longest side is the top.
Step 5
Start adding legs. Front left foot in front of wing. It has four very thin segments and points out the same angle to the left antenna. Add one leg to the right of the head. It also has four long segments and the same angle to the right antenna.
Step 6
Draw another left leg just below the left wing. It has four segments and is about the same size as the front legs. The foot is pointing down and at an angle outward.
Step 7
Draw a middle leg on the right side of the body. It also has four long thin segments and points down and out.
Step 8
The last leg on the left lies just behind the middle leg. It is the same size with middle legs and also just down and out.
Step 9
Add the last leg to the right side of the body. It is the same size as the last one on the left. It’s also just down and out.
Step 10
Finally color your child so that he or she is more realistic if possible


