How to Draw a Baseball Player easy with this how-to video and step-by-step drawing instructions. Easy drawing tutorial for beginners and kids.
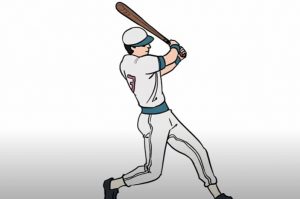
Please see the drawing tutorial in the video below
You can refer to the simple step-by-step drawing guide below
Step 1
Like any human being, a baseball player starts with a skeleton. In our example, he would be standing ready to hit. First sketch the head in an oval shape, or rather a circular egg, then draw a straight line of the spine, on which we draw the chest and pelvis. Use light lines to outline the arms and legs.
Step 2
Out of the two intersecting lines on the head, we will draw the details of the face. Next, outline the neck and the outlines of the torso, this part narrows at the waist. With the help of simple geometries, outline the arms and legs as shown in our example. At the end of the step, sketch a bat in the hand.
Step 3
Now let’s sketch some details about our baseball player drawing. On top we will outline a round helmet. Next outline the elements of the dress and add some creases to the fabric. The main forms and details of the drawing are done, and from the next step we will begin to draw the final details.
Step 4
Draw the details of the face, that is, the eyes, nose, and mouth using clear and dark lines guided by the intersecting lines from the second step. Our baseball player’s face should be very focused. Also, be sure to remove unnecessary instructions from the face area.
Step 5
In this step we have finished drawing the baseball player’s head. Use the clear lines to draw the contours of the circular helmet and visor. Next, draw the visible parts of the hair, ears, and neck. Delete all unnecessary lines from the beginning.
Step 6
Now let’s move a little lower and work with the baseball player’s upper arms and torso. Hand drawn short sleeves and contour of arms. Carefully draw all necessary muscles, finger contours and creases.
Step 7
Now finish drawing the upper part of the baseball player’s body and clothes. When you draw clothes, be aware that the creases should lie in the direction of the body movement. In the same step we need to draw a belt and erase all the guides from the top of the body.
Step 8
It’s still just for drawing the lower body. With the help of clear, bold, and smooth lines, carefully draw the outlines of the pants and the creases on the pants. In the same step, we draw the baseball player’s shoe and erase all the lines that we drew in the first three steps.
Step 9
To draw shadows, you first need to think about where the light is coming from. In our example, the light falls from the top right corner. Next, using different densities hatching, add shadows to the least lighted areas of the body. Alternatively, you can make the shadow darker by adding another coloring layer.
Today we showed you how to draw a baseball player. The lesson was complicated, but we finally got a picture of the actual baseball player. This lesson is one of a series of lessons on different sports disciplines. In order not to miss out on new drawing lessons from this series, subscribe to us on social media and visit our site as often as possible.



No Responses