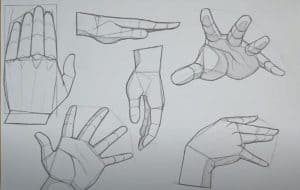
Anime Hands Drawing easy with this how-to video and step-by-step drawing instructions. How to draw anime for beginners and everyone.

Please see the drawing tutorial in the video below
You can refer to the simple step-by-step drawing guide below
Step 1
This first step isn’t really a step at all, it’s more like a diagram of an anatomical manga/anime hand. As you can see the left hand is a regular drawn anime hand and the right hand is the same, except I added in the skeleton diagram what the bones should look like.
Step 2
This second step is like no other, it’s more like a postural assessment of all the different hand movements and finger positions. As you can see, there are thirteen common possessions of anime/manga characters.
Step 3
This is a typical anime/manga hand as it is colored with fingers spread out and posing. When coloring you should end up with something like this.
Step 4
Start this first step by drawing a bell for the middle of the hand. When it is drawn, you add five lines for the fingers. I added some arrows to show you how far apart each finger should look.
Step 5
Now that you have drawn the hand frame, you can add three circles on each finger. These circles will help you draw the finger shapes of anime/manga hands. Before moving on to the next step, you will draw a line for the wrist and arm.
Step 6
In this sixth step, you will begin to draw the shapes of the fingers and hands. Once done, you will add the right shape of the arm, wrist, and hand.
Step 7
All you will do here is add the knuckles and wrist bones. Once done, you will start erasing all the principles and shapes that you drew in the previous steps.
Step 8
Here is a picture of how a complete drawing of a clenched hand and arm and wrist is in an upright position. As you can see, all the fingers are closed and shaped like a normal anime/manga hand.
Step 9
To start this anime/manga hand drawing tutorial, you will see how to draw the initial shapes of the palm and wrist lines. I’ve written down a trick for you to make this first step easy to follow.
Step 10
This is what your first step would look like without the actual hand and wrist guide silhouettes. It doesn’t look like much now, but when you finish this tutorial, your sketch will look like a hand.
Step 11
In this next step, you’ll start adding lines for the fingers and knuckles. Once done, you’ll add the outline for the left side of the wrist ad here.
Step 12
This is your final drawing step and all you will do here is draw the knuckle lines and complete the finger shapes and draw the thumb. Add some details and definition and start erasing all the guides and shapes that you drew in the previous steps.
Step 13
Once you’re done, what your sketch will look like when you’re done. All you have to do now is color. I hope you enjoyed this double tutorial on how to draw hands and arms in anime and manga step by step.


