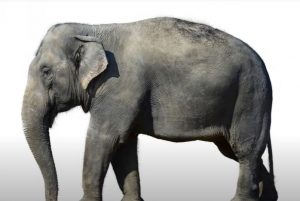
How To Draw A Realistic Elephant with this how-to video and step-by-step drawing instructions. Pencil drawing tutorials for beginners and All.

Please see the drawing tutorial in the video below
You can refer to the simple step-by-step drawing guide below
Step 1
Start by drawing a large potato to create the basic shape of the head and body. You can also do this by making two circles – a large circle for the belly and a smaller circle for the head. Then, join the two circles to form a large irregular oval (‘potato’ shape). Notice how the head sits higher than the rest of the body.
Step 2
The elephant trunk is clearly the dominant feature on its face. It has a very wide base (see where it connects to the ‘potato’ shape) and extends to the ground. The green arrow shows how the front of the stem curves slightly forward as it joins the trunk, and the orange arrow shows the tight curve the back of the stem creates as it merges with the bottom of the elephant’s face. The leg is pretty simple to draw and will be explained in the next step, but just note here that the leg near the front is drawn about 1/3 of the length of the elephant.
Step 3
Unlike most other animals, elephant legs are easy to draw. The two near legs were added in step 2 and the two added here are therefore on the opposite side of the elephant (‘far side’). Since the perspective of the drawing is from a low perspective, all the pins are approximately the same length, with the pins on the far side just slightly shorter. Also, don’t fall into the trap of just drawing long stumps for legs – see how the hind legs are quite curved, especially when they join the main body, and the front legs are much wider at the top and have eyes relatively thin ankles. . The feet are also important – the forefoot looks a bit like a mushroom and is quite symmetrical while the hindfoot just hooks at the front.
Step 4
There are a few facial features that we need to add before we start shading the drawing. First, add tusks that emanate from the lowest point of the skull and curve down and forward from the face. You can learn the size and shape of the tusks – some male elephants have huge tusks that can weigh over 120 pounds each! If you want to draw a female elephant, make the tusks smaller. Next, add large ears behind the face. You can see how the ears are as wide as the front feet at the widest point and how they form a triangle with the top edge curved. Then add the eye in the center of the face. The visible part of the eye is just a thin oval, but the eyelid and the bony structure around the eye make it a bit more complicated. See print for a larger view (it looks like a soup ladle on its side). Finally, redraw the top of the elephant’s back, making it dip in the middle like a saddle.
Step 5
Now we can start creating the elephant skin texture. Elephant skin is very thick and has thousands of small wrinkles crisscrossing the body. It looks complicated at first, but it’s actually one of the easiest animal motifs to draw. We’ll start by shading the skin areas. We only want a base that has a light medium tone for the skin because we want the wrinkles to stand out at a later stage. Make some areas below and behind the legs darker, and the top surfaces of the face and back light. Note the direction of the light source (orange arrow).
Step 6
Smooth shadows. This technique is explained below the drawing and consists only of shading an area (1), smoothing it with a cotton/paper towel (2) (using a circular motion), and then repeating the steps ( 3, 4). You don’t really need too fine shade because elephants have very rough skin. We need to develop the shadow a little more in the next step.
Step 7
There are only four areas of strong shadow in the figure – behind the ears, behind the forelegs/under the body, behind the abdomen and on the distal hindquarters. When drawing the shadow of the ear, try to keep it similar in shape to the shape of the ear. There are also some facial shadows cast by the elephant’s skull.
Step 8
Use a tissue/makeup remover cotton to evenly apply the dark areas.
Step 9
Now we can start painting the skin texture. Elephants with heavily wrinkled skin require a special technique. The texture is also not the same in all areas of the elephant’s body – the skin around the hind legs has deep and long wrinkles, the skin around the front legs has a textured crisscross of thin wrinkles, and the ears have fine lines. We’ll start with the wrinkled area around the hind legs/hip area.
Step 10
The hip area has very deep wrinkles. [1] Start by just contouring the creases, making sure you get the correct general shape. [2] Thicken the line with a dark pencil. [3] Now create irregular shaped lines with blobs and blobs. [4] Finally, shade below the dark wrinkles and leave a thin strip of highlighter above them.
Step 11
Here you can see how skin texture is progressing around the three highlighted areas. The wrinkles on the face are all aligned along the bone line that we painted earlier, and also note how the wrinkles wrap around the eyes. The creases behind the knee on the front legs are very prominent, especially in the finished drawing. Since they are highlights, they are drawn by simply sketching thin curved bands with a sharp, dark pencil.
Step 12
Begin to shade the skin folds on the edge of the ear. It’s easy to overdo this, so try not to go too crazy.
Step 13
Begins to develop texture on the trunk. These wrinkles arc across the width of the trunk and vary in thickness.
Step 14
Continue adding loops to the trunk as shown. Then add more lines to the forelegs and torso to develop a leathery texture. The image on the left shows the development of this texture and the image on the right shows how the rear leg texture is progressing.
Step 15
The texture of the skin that covers most of the front legs and body is made up of many small, criss-crossed wrinkles. This is a fairly simple process that involves just drawing a series of lines in one direction, then another line over it in the other direction. At the end, you may want to add a few darker lines. Make sure you use a sharp pencil and don’t press too hard (at first anyway). Also, if you’re not happy with how the texture is, you can use a cotton pad/paper towel to blur the lines instead of using an eraser.
Step 16
Add more wrinkles to the trunk. Notice how these wrinkles become less and less obvious towards the bottom of the trunk, to the point where only small wrinkles are visible at the top of the trunk.
Step 17
Shade over most of the trunk and then add small vertical notches above the wrinkles you added in the previous steps. These notches can be quite random shapes; they just need to break the symmetry of the trunk texture. I also added a lot of small details to the rear legs. Remember that you don’t have to try and copy all the details exactly as I drew – you can certainly do it yourself.
Step 18
In this step you need to perfect the skin structure of the main areas of the body. There are two textures that need to be added; fine, small wrinkles (use technique from step 15) to the upper left area of the body, and deep, dark wrinkles (from step 10) to the lower right area.
Step 19
This is a magnified image of the body area to help you see the finer details.
Step 20
Now we are almost done. The only important steps left to complete are the creases along the elephant’s back and the shadow underneath the elephant. When drawing shadows, keep in mind that the image’s light source is the midday sun and comes from the upper left area of the page. Therefore, the shadow falls slightly to the right of the page, behind the elephant. Also note that the shadow is very thin from the point of view of the drawing – in particular the shadow of the trunk is more than a slightly thick line.
Step 21
Finish shading as much as you can with the 4 + B pencil. Then finally add a slight shading on the underside of the ivory and a few lines to create some detail, and you’re done. If you want to add a background to the drawing, make the horizon run just below the bottom of the ivory. That’s it! I hope you enjoyed this tutorial, unfortunately this will be my last major tutorial for quite a while. I’ve really enjoyed making them over the past few months and hope you find them useful.


