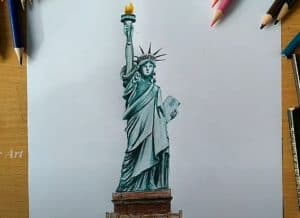
How to Draw the Statue of Liberty easy with this how-to video and step-by-step drawing instructions. Pencil drawing tutorial for beginners and everyone.

Please see the drawing tutorial in the video below
You can refer to the simple step-by-step drawing guide below
Step 1
Despite the fact that this is not a real person, but rather a statue, we will apply the principles of drawing a real person. First of all, let’s sketch the head in the form of an oval. Next, draw a long line of the backbone. On this line we outline the chest and pelvis. Then outline the arms and legs using simple lines. Don’t forget that all of these lines should be made as light as possible.
Step 2
All the second steps of our drawing tutorial are meant for us to add volume to the drawing, and this lesson is no exception. First outline the facial junctions. Next, outline the neck and torso, which narrows around the waist. With the help of simple lines we outline the arms and legs. Please note that here we have applied standard principles to drawing a woman’s figure.
Step 3
Now let’s add the most basic details to our artboard. First of all, outline the details of the face with the help of the junction lines from the previous step. Next, outline the outline of the crown and the hair. With the help of long lines outline the contours of the tunic. One hand sketches the torch and the other hand sketches the tablet. Outline the pedestal under your feet.
Step 4
So, starting from this step, we are going to start drawing the final details. And traditionally, we will begin to draw the Statue of Liberty from above. Using clear and bold lines, carefully draw the contours of the crown, hair, and details of the face. Note that the facial features on the Statue of Liberty must resemble the facial features of ancient Greek statues.
Step 5
Now let’s start painting the details of the Statue of Liberty’s clothing details. Using long lines, carefully draw the top layer of clothing, as in our example. Try to repeat all the lines and creases so that the clothes look their best, as shown in Drawingforall.net’s drawing of the Statue of Liberty by the artists of Drawingforall.net.
Step 6
In this step we will continue to draw the clothes. As you can see, here we will draw the clothing layer below. Note that there are a lot of creases on this layer compared to the previous one. In the same step, we need to draw a visible foot of the Statue of Liberty.
Step 7
So let’s come to the bracelet of the Statue of Liberty. Using clear and dark lines, carefully draw them out, taking all curves into account, as shown in our example below. At the same time, carefully draw the base underneath the Statue, holding the torch and the plaque. Don’t forget to remove all unnecessary rules from the drawing.
Step 8
The drawing of the Statue of Liberty is almost complete, but for a final look we’ll need to paint the shadow. We will do this with the help of classic incubators. As mentioned many times, we need to first define the light source, then place a shadow on the least lighted areas of the drawing.
Thus, the tutorial on drawing the Statue of Liberty has ended. This statue for many is a symbol of dream attainment and we hope that its presence on HTDraw.com will be a sign of achieving the American dream for each of us, the authors. and readers of our website …


i love your 3d art