How To Draw A Windmill easy with this how-to video and step-by-step drawing instructions. Easy drawing for kids and everyone.
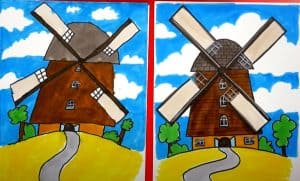
Please see the drawing tutorial in the video below
You can refer to the simple step-by-step drawing guide below
Step 1
It wouldn’t look like a windmill without some blades and that’s what we’re going to start with at the start of this tutorial on how to draw a windmill.
Each windmill blade will have a slightly thicker and narrower end as it moves towards the middle. They will be drawn in a rather rectangular shape, as shown in the reference image.
Inside the contour for each blade, there will be several lines drawn along the inner circumference of the contour. On the inner sides there will also be some small mesh patterns.
Finally, finish with some straight lines extending inward from the bottom of each blade. These will connect to the hub rotor, which we will draw in the next step of the tutorial.
Step 2 – Now draw the propeller and other wings
In this second step of the windmill drawing, you will add the center rotor and the rest of the blades.
The rotor should be pretty simple to add! All you need to do for the rotor is draw a small circle to which the beams at the bottom of the first two rotors will attach.
Then draw a smaller circle inside this rotor outline to complete it.
Finally, add two more propellers to this propeller. These shapes will be at different angles, but otherwise they will look exactly the same as the first two shapes you drew. Then it’s time for step 3!
Step 3 – Draw the beginning of the body for this windmill
You’ll now be ready to start drawing the body of this structure in this third step of our windmill tutorial.
The body of the structure will look rather quaint and classic, and you can start by drawing a conical roof.
This will have curves for the edges, and then you can add rows of small circles to its surface to give it a tiled look.
The sides of the windmill will be fairly straight and you can add some small rectangles all over the interior of the windmill border for a brick look.
You can then continue adding to the design in the next few steps of the tutorial!
Step 4 – Next, draw some more details for the windmill
Before moving on to the final details of this windmill drawing, you will add some more important features.
In this step we will focus on the windows and doors for the windmill as well as the ground it is on. The window will be small and round with a small rectangular sill below it.
The door will look like a larger version of the window as it will have the same round shape.
We’ll then finish by drawing some bushes on the ground next to it, and these can be drawn with some small, bumpy lines.
Once these details have been drawn, it’s time for the final details we mentioned earlier, so move on!
Step 5 – Add the final details to your windmill drawing
You have completed all the major details and outlines in this tutorial on how to draw a windmill and in this section we will complete some smaller final details.
First, we’ll add some vertical and horizontal curves to the underside of the cone roof for some more texture.
We will then add some vertical lines along the sides of the windmill body, as these will help add some dimension to the image.
Finish this step by painting some wood details on the front door, then you can proceed to the final step.
Before doing so, you can also add other details. They can include the landscape in the background or maybe some weather details.
How will you end this?
Step 6 – Finish your windmill drawing in color
Now you are ready to complete this windmill painting with some color! In our example image, we’ve completed the image’s eerie, relaxing feel by using some more muted, bright colors.
These include some brown for the smaller details along with beige for the windmill body. Some green for the bush next to it also helps to add some splashes of brighter color.
These are colors you can also choose from, but you should also feel free to choose any complementary colors you might like instead!
Will you use a similar color scheme or will you choose a completely unique set of colors?
Your Windmill Drawing is done!
You’ve completed all 6 steps of this windmill drawing tutorial, and you’ve created a wonderfully peaceful work of art in the process!
As long as you carefully follow all the steps we’ve laid out for you, you’ll be finished with this adorable picture before you know it.
Then you can end up with your own additional details, elements and ideas! This is your chance to show off your creativity, so have fun with it as you really personalize the photo.
If you’re ready for more, you can find some new drawing tutorials to enjoy on our site!
