How to draw a bow and arrow easy with this how-to video and step-by-step drawing instructions. Easy drawing tutorial for beginners and kids.
Please see the drawing tutorial in the video below
You can refer to the simple step-by-step drawing guide below
Step 1
This is a very simple tutorial and this first step is very easy. You will first draw the shape of the curved handle and then draw the shape of the handle. next draw a line for the zipper and then draw the perfectly aligned shape of the wooden arrow as shown to you here.
Step 2
Next, you will start sketching the actual thickness of the bow as shown. Make sure the ends are bent inward and then out again. On the arrow, you will draw the tip of the triangle and then two simple oblique lines for the tail of the feather.
Step 3
In this next step, you’ll cut off the ends of the bow and then detail the fist with curled lines to make it look like it will fit between your fingers. For the arrow, you will detail the head and then finish shaping the feather tail and draw the end of the arrow a diamond shape.
Step 4
You will then begin this final drawing step by lightly detailing the handle with the lines as well as placing the grooves in the feathers on the center part of the arrow. You will also detail the diamond tip. Erase the path through the handle to clean up your drawing and that’s it.
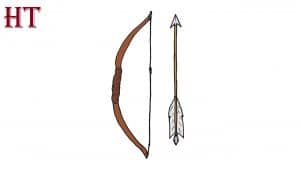
Step 5
This is what your final step will look like when you’re done. All you have to do now is color it and you’re done. That will end this tutorial on how to draw bows easy step by step.


