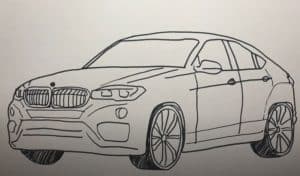
How to Draw a BMW X6 easy with this how-to video and step-by-step drawing instructions. Car Drawing tutorial for beginners and everyone.

Please see the drawing tutorial in the video below
You can refer to the simple step-by-step drawing guide below
Step 1
The BMW X6 is a crossover, and the crossovers have a square body. Therefore, we first sketch out the contours of a body that is both tall enough and square with very light lines. This step we only need to outline the general outline of the body, should not press too hard on the pencil.
Step 2
In this step we will continue to use very light, almost transparent lines. With the help of such contours, we outline the contours of the famous headlights, bumpers and grille at the front of the bodywork. On the side, we outline the contour of the mirror, the large wheel and the wheel arch.
Step 3
In the previous two steps we have drawn the most basic lines of the body, from this step we will use very bold and clear lines. Using such lines, carefully draw the contours of the large headlights, dual grille, and the logo in the front center of the hood.
Step 4
We continue to draw details on the front of the BMW X6. Here we will need to draw all bumpers, air intakes and fog lights on the bumper. In the same step, carefully draw the contours of the hood with the help of long and smooth lines.
Step 5
Now let’s head to the front end of the BMW X6. With the help of long and smooth lines, carefully draw the contours of the sloping roof portion of our diagonal house. Next, draw the front and side windows. In the same step, we need to draw the rearview mirror.
Step 6
Continuing the contour of the roof, forming the car’s rear section and taillights. Then continue the window lines and draw the doors. Next draw the door handles and the lines along the bodywork. In the same step, draw the bottom line and remove any unnecessary instructions on the body of our BMW X6.
Step 7
With the help of smooth lines draw the contours of the wheel and the wheel arches. Note that this step is one of the most difficult in this lesson, as the wheels should be very smooth and round. If you’ve already done that and your wheel looks like the one in our example, then move on to the next step.
Step 8
This step will also be quite complicated. Here we will need to draw the wheel rims. First, draw the center of the rings, then start drawing lines going from the center to the edges. By the way, you can draw the rim like in our example, or give any other rim design.
Step 9
And the final step of our drawing lesson on how to draw a BMW X6, where we will paint shadows. First of all, paint glare on the windows and bodywork with the help of light and straight lines. Next, paint the shadow using the hatches with different intensities, like in our example.
Here’s another lesson from the “Automobiles” category in which we show how to draw a BMW X6. In the future, we plan to create a large number of different drawing lessons about the most different cars. So visit our website as often as possible so you don’t miss new lessons about BMW, Mercedes and other vehicles.


