Flowers will give a lot of color and beauty to the world. Seeing a pretty flower with a fragrance is sure to draw a smile on your face. Bluebells are one of those flowers that will bring beauty to your surroundings. Did you know that dumbbells take at least 5 years for a seed to develop into a tuber? Bluebells are mainly found and protected by law in the UK. If you separate the bluebell from its habitat, it is already illegal. Any trade in wild common bluebell bulbs or seeds is illegal and you must pay the amount required by law. According to legend, bluebells are also known as “faerie flowers”. Because the fairies used them to attract and trap people who passed through the forest, especially children. There are many other names for bluebells, namely common bluebells, English bluebells, British bluebells, wood bells and wild hyacinth. And each name has its own history just like the fairy flowers.
Since bluebells are difficult to reach, we can create our own bluebells by following the step-by-step instructions below.
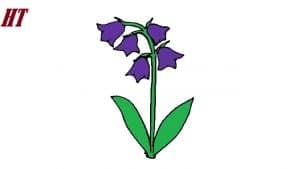
Please see the drawing tutorial in the video below
You can refer to the simple step-by-step drawing guide below
Step 1: Launch Stem
Let’s start your green bell by drawing the trunk. Stems are very important to the plant as they will distribute nutrients from different parts of the plant. Now to draw the trunk, simply draw a long curved line on your paper.
Step 2: Add details
After the stem, add a short diagonal line for the leaves and flowers. Let’s start by placing 5 diagonal lines on the trunk. Make sure they are not in the same place, if possible measure the distance diagonally to make our drawing better.
Step 3: Draw the Flower Guide
For instructions on how to draw the flower, simply draw an oval on the top of the stem. Then draw another oval from the second diagonal on its left side and another on its right side.
Step 4: Add Petals
From the oval you drew earlier, add petals to it. From the bottom of that oval, draw an upward diagonal then draw a curved line to connect it to the top of the oval. Then do these with the following oval in your drawing.
Step 5: Add details
To make our flowers more beautiful, let’s add more details to our petals. From the bottom of the oval you drew earlier, draw a not-so-perfect upward line then connect this line to the oval by drawing another horizontal curve. Do the same with the flowers that you drew earlier. But this time the petal should draw a little shorter than the first petal.
Step 6: Draw more flowers
Your drawing is still missing something. Let’s add more flowers to the empty stem. This time draw an oval with a point on the edge. Draw it on top of the stem without flowers.
Step 7: Add leaves
The flowers look so empty with no leaves. So let’s add leaves to our dumbbells for a better look. Draw two leaves under each flower. To draw the leaves, draw two curved lines that will meet at the bottom. It looks like an oval with a pointed edge.
Step 8: Add more leaves
One more step and you’re done with your beautiful green dumbbells. Add more leaves to your dumbbell, just draw two curved lines that meet on your dumbbell body. Again, these leaves look like an oval with pointed edges.
Step 9: Finish!
Cheering! Now that you’ve finished your drawing, it’s time to finish it. In this step, show your creativity by bringing your green dumbbells to life. We have examples of how to color blue dumbbells, but you can also choose your favorite color. Hope you enjoy drawing your blue bell. Don’t forget to show your drawings to family and friends. Congratulations!
