Braids Drawing easy by Pencil with this how-to video and step-by-step drawing instructions. Pencil drawing tutorials for beginners and everyone.
Please see the drawing tutorial in the video below
You can refer to the simple step-by-step drawing guide below
Step 1 – Start with two vertical lines
For the first step of how to draw your braids, create the shape of the braid by drawing two vertical lines running parallel to each other.
Remember that the hair near the top is thicker, so the braid will start out wider and then narrow down towards the tie. However, this shouldn’t be too dramatic.
You can draw this freehand instead of using a ruler because the lines don’t have to be perfectly straight.
Here you are just creating a rough outline of the braid for you to follow as you draw the appropriate lines afterwards, which will help you get the proportions of each section of hair just right.
Step 2 – Identify the Center
Now draw a faint line down between the two outer guides.
If you’re worried that you’ve drawn these first lines too dark, don’t bother starting over as they may be masked by some steps later.
Step 3 – Add Two Principles
On either side of the centerline, draw two other vertical guides. There will now be a total of 5 vertical lines and these will provide the basis for drawing your braid.
Step 4 – Create a zigzag line inside the guide
Make a zigzag going down the center of this shape, touching either side of the two inner guides you just drew with the zigzag going back and forth.
The corner points of the zigzag should be similar to the right angle, although this is not necessarily exact.
As the outer lines of the braid narrow towards the bottom, the zigzag will also become thinner and the shape it creates with its back and forth movements will become smaller.
Step 5 – Draw lines to shape the edges
For the next step of your braid, return to the wider end at the top of the zigzag and draw a diagonal line from the first point in the zigzag.
You will need to repeat this when going down the braid and the lines should run up from each point where the zigzag line hits one side and bounces back to the opposite side.
Step 6 – Create a Circle from Edge to Center
Starting at the top of the braid, draw a small curved line in a semicircle that is neither too round nor too irregular in shape.
The outer point of the curve must touch the left-left line, and it must join the 4th zigzag line, ending at the same place where it touches the line to the right of the centerline.
Step 7 – Create All Lines
The trick to repeating these half-circle curves as you complete the rest of the braids is to imagine that a zigzag makes up the inside of each section of hair.
Step 8 – Delete Instructions
Once you’re happy with the braid and you’ve drawn each individual section of hair as they will fall into the braid, you can use the eraser tool to clean up the originals.
This is why you only need to blur the first few lines, otherwise they’ll be harder to erase at this stage, meaning there’s a greater chance you’ll accidentally erase one of the lines you didn’t draw. means to escape.
Step 9 – You can use a straight edge to limit the space
One way to make this part of the braid easier is to use the straight edge of a notebook or ruler in a zigzag way before it joins the curve.
This will include some other guidelines on the page that make it easier to focus on the part of the hair you’re drawing.
You can use a straight edge to limit the space
9. You can use a straight edge to limit the space
Just like real braids, it can be difficult to remember where you are with the different sections of your hair in your braid drawing, so this tip is invaluable for staying on track.
Step 10 – Shade a corner
Once you’re happy with the outline and details, you can now start shading each strand of hair that makes up the braid.The best thing about drawing braids is that the hair will never be perfect, simply because hair never falls out perfectly in real life, so you don’t have to worry about making small mistakes.
Step 11 – Color each part of the braid
Color each part of the braid with individual shading, starting with the sections at the top and working towards the bottom of the braid.
Step 12 – Keep your pencil strokes varied
If you want your braids to look realistic, remember that the natural texture of your hair means that it’s impossible for every section of hair to look the same.
Try to keep your pencil strokes varied and make sure each paragraph is a little different.
Step 13 – Draw darker lines in the corner of each part
To create the right shade, draw darker lines at the corners of each section of hair and leave it lighter or leave it completely blank in the middle.
If your lines are too bold in the center, resist the temptation to try and correct this by completely darkening the corners of the braid.
Even if you’ve decided to go black in your braid drawing, when you make the corners darker instead of lighter in the middle, you risk losing the individuality of the strands.
This will leave you with a dark braid that gets clogged and loses some of its texture.Instead of going through the darker parts of the yarn, use the eraser tool to rub some darker lines in the center to create the same effect.
Step 15 – Make the center part of the braid look shiny
The braids usually have a shine on the areas closest to the viewer that will be in the front center of the braid drawing.
Make the middle part of the braid look shiny
However, it is important to think about where the light is coming from during this stage, as this can affect exactly where the lighter part of the braids will fall.
Step 16 – Color in segments of your braid drawing in layers
You can color in segments of the braid drawing layer by layer, which will also help create the natural texture that real hair creates.
Step 17 – Two Layers of Gloss
Usually two layers of shading is enough, starting with the darker lines first and then shading in the middle shadow second.
Step 18 – No Shadow in the Center
After you’ve completed the second layer of shading, make sure there’s still practically no ghosting in the centers and use eraser if needed to erase any lines.
Step 19 – Smoothing the Shadows
Now it’s time to switch tools, so put down your pencil and choose one with a wider tip.
Using a softer and thicker pencil tip allows you to smooth the shadow areas so they appear to blend better together.
Step 20 – Continue coloring the braids with shadows
You’ll start seeing braids come together now, because you’re almost done with this braid tutorial!
The next task is to simply continue coloring the braids with the drop shadow. As you pull the braid down, the sections you’re shading will become much smaller than the top.
Step 21 – Draw lines according to curves and alignment
Remember that for every segment, you should draw new lines according to the curve and alignment of the part you are shading.
Draw lines according to curves and alignment
Step 22 – Finishing the Hair Sections
Finish the rest of the hair until the entire braid is complete.
Step 23 – Draw a small rectangle for the hair band
At the bottom of the braid, draw a small rectangle for the hair tie or scrunchie. You can use any hair tie you want for this part, as long as you know how to draw it!
Draw a small rectangle to tie the hair
Step 24 – Create the ponytail
For the next step of how to draw braids, create the ends of the hair.
Starting from the left side of the hair tie, bring your pencil downwards in a curved and slightly arched shape. End it at one point and curve it up to reconnect to the opposite side of the tie.
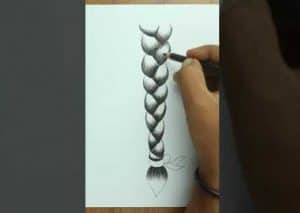
Step 25 – Shading the Tail
Add some shading to the ends of the braids.
Step 26 – Create More Contrast
Now go in and create more contrast between the different sections of hair.
Do this by darkening some of the areas where the braid cuts across itself, as this will really define the different strands of hair to make it look like they’re intertwined.
Step 27 – Identify Single Hairs
Okay, so about all that we talked about earlier about leaving the middle of each braid blank… Well, skip that.
That’s an important step, but now you can start identifying single strands of hair at random in different parts of the braid.
Just make sure to keep things varied so you don’t repeat identical lines. Emphasize some lines and shadows more than others, as this will create more texture.
Step 28 – Add some hair for effect
Depending on how neat or uncluttered you want the braid to be, you may want to soften the corners of the inner zigzag.
You can even create some subtle circles or shading in the corner points to add dimension to the braid.
You can also add a few side-swept strands to give the effect that the braid will loosen up a bit like at the end of a long day.
Step 29 – Lighten Any Area With Eraser Tool
Take a final look at the entire braid and again, lighten any areas that look a bit dark with the eraser tool.
Your braid drawing is done
And voila, now you have completed our tutorial on how to draw braids!
Does your arm ache as much as after completing a real braid? Hopefully not, as this tutorial will show you an easy way to create a braid for salon-worthy results.


No Responses