How to draw realistic Hair by pencil with this how-to video and step-by-step drawing instructions. Pencil drawing tutorials for beginners and everyone.
Please see the drawing tutorial in the video below
You can refer to the simple step-by-step drawing guide below
Volume, Flow, Value and Texture
1. Volume
It helps to create the loose outlines of the skull before you start drawing the hair. If you think of hair without the 3-D shape of a human head, it lacks volume and you run the risk of having part of the skull removed. The hair hugs the head, but is not plastered on the head. For most people with long hair, you can expect at least 2 cm “hair height” from their actual height and at least 2 cm on the sides. Having trouble drawing the head? Click here to learn how to draw one from the front and here to draw one from the side.
2. Flow
To draw hair with volume, you need to pay attention to the underlying structure. For long hairstyles at rest, the hair will fall down, hug the head and wrap around the shoulders. Slightly liquid. You want to start by outlining the basic structure of your hair and keep your strokes loose and simple.
3. Value (Shadow, Midtone, Highlight)
Hair ends contain many shades, so before you start scribbling, take some time to determine where the light is coming from and how it will affect your hair’s tonal value. If you are working with a reference image where the light is too low, correct the image or increase the contrast using a free image editing program like gimp to bring out the 3 different shades – Make them much easier to identify.
4. Texture
The average human head contains about 150,000 hairs. Just thinking about this can be very discouraging. First of all, you don’t have to spend 90% of your time meticulously drawing your subject’s hair. In fact, this step can be done quickly, it might even become your favorite step. The key to adding texture is to use confident, steady strokes and maintain a consistent flow. Tip: You can create long, continuous, and smooth lines by using your pencil grip while harnessing the strength of your elbows and shoulders instead of your fingers and wrists. Work on one section of hair at a time, while following the general direction in which the hairs flow. In dark areas, don’t be afraid to emphasize (I used 6B to 8B for these areas). To bring out highlights, flatten your kneaded eraser and swipe it in the desired direction. The eraser will get too dirty after the first swipe, so fold it in and smooth it out after each swipe. You can add more or less detail depending on the level of realism you are trying to achieve.
Let’s take a close look at how to draw a small lock of hair
When creating the first layer of pencil strokes, blend it in different strengths. I use a mixture of dull and sharpened pencils as well as mechanical pencils. As you’re making each stroke, remember to press and then lift as you get closer to the area you want to mark. Direct the strokes inward so that they fade in the center of the curl. Add a second stroke layer. During this phase, I usually choose the HB – 4B 0.5mm for editing and the very dull 6B to fill in some of the white space without making it look too busy. Continue doing this until you achieve the desired result. If you want to create a shiny look or reproduce harsh light, try to keep the highlights fairly clean. You can use an eraser if needed. As for the ends, stroke them back to give your hair a nicer look without being too dull and dull.
Useful technique
Drawing hair is not just a bunch of lines in boring repetitive patterns. Use the 4 techniques below to make your drawings more interesting. If you have trouble drawing long hair because your pencil strokes are too short or broken, try holding the pencil farther away from the tip. This will give you more range of motion, creating longer, smoother strokes. Are you ready to draw some hair?
Follow the steps and techniques above in the 2 mini tutorials below! Pencils that I will be using: 4B, 6B, 8B How to draw curly hair Drawing curly hair is really fun and absolutely great for building confidence when adding texture.
1. Practice drawing curls using cylinders. This will help you get realistic curls with lots of volume.
2. Sometimes it helps to create associations. So think of a spool of hair as a ribbon. They have more rings extending further out near the bottom. Use curves and avoid any straight lines for a more realistic feel and flow. (4B)
3. Pay attention to the marked hair areas and keep the style accordingly. For this example, the highlight is in the center. As you can see, the hairs near the front have more highlights than the back. (6B)
4. Use quick strokes to add texture. Get rid of boring patterns and lines by overlapping or adding stray hairs. Get creative and look to reference images or even mirrors for inspiration. (4B, 8B).
How to draw curly hair
Drawing curly hair is really fun and absolutely great for building confidence when adding texture.
1. Practice drawing curls using cylinders. This will help you get realistic curls with lots of volume.
2. Sometimes it helps to create associations. So think of a spool of hair as a ribbon. They have more rings extending further out near the bottom. Use curves and avoid any straight lines for a more realistic feel and flow. (4B)
3. Pay attention to the highlighted hair areas and keep the style accordingly. For this example, the highlight is in the center. As you can see, the hairs near the front have more highlights than the back. (6B)
4. Use quick strokes to add texture. Get rid of boring patterns and lines by overlapping or adding stray hairs. Get creative and look to reference images or even mirrors for inspiration. (4B, 8B).
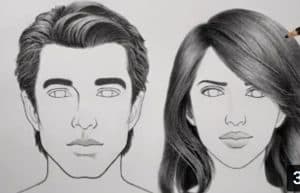
How to draw short hair
Drawing short hair is really no different than drawing long hair, except that you’ll find yourself covering less ground in the same amount of time because the strands are much shorter.
1. Create the shape of the head and place the ears in the correct position. (4B) Click here to learn how to draw the head/face from the side and where to draw the ears.
2. Draw a loose outline of the hair using strokes that flow in the actual direction of the hair. (4B)
3. Shade the dark areas, keep in mind this step is to help you see the big picture. (6B)
4. Add texture by working on one area of hair at a time. Outlining the hair groups and then adding texture is also a good technique. For thin hair, use a ‘v’ shape to slim down most of the ends. Remember that thick hair usually doesn’t taper at the ends. Instead, most hairs will stand on their own. (4B, 6B, 8B)
This is my longest tutorial to date! I hope it covers everything. If you want to see more tutorials like this, please let me know. Also, don’t forget to share the love using the share buttons below 🙂 Does the thought of drawing hair make your heart ache? Let me know in the comments!

 Step by Step")


