How to draw lips from the 3/4 view easy with this how-to video and step-by-step drawing instructions. Pencil drawing tutorials for beginners and everyone.
Please see the drawing tutorial in the video below
You can refer to the simple step-by-step drawing guide below
Step 1
Draw a cross and triangle Using the HB pencil draw a vertical line. Add another line through it slightly angled. Then draw a triangle.
Step 2
Add a Curve at the Top Create a curve close to the top of the triangle. This is the bow of the cupid. The distance of the curve to the base of the triangle will determine the size/thickness of the lips.
Step 3
Draw the instructions for the mouth opening. Draw a long shallow curved line in the bottom half of the triangle. The length of this line will determine the width of your lips. Since the triangle is facing our left side, the left side of the lips will be less visible, so draw your curve shorter on the left and longer on the right side of the vertical.
Step 4
Draw a border around the upper lip. Complete the outline of the upper lip by connecting the cupid bow to the predefined corners of the mouth.
Step 5
Finish the upper lip. While inside the triangle, draw another curve over the contour created in step 4. Depending on how much you bring this forward (left) or back (right), you can ending with a strong overbite or underbite. Complete this section by following the rest of the outline.
Step 6
Draw the bottom lip line. Draw the lower lip by starting at the base of the triangle and then bending your line up on each side. The curve drawn for the lower lip does not need to touch the corner of the mouth. If the lower lip looks like it’s oozing out too much, just erase it and put it more to the right. When you’re done, delete all guidelines.
Step 7
Add some contour lines. Shading time! Use any realistic shading technique of your choice. For this example, I will use the contour method. It’s great for shading lips as the lines help create realistic lip wrinkles/texture. The more curved your curves, the more plump your lips will be.
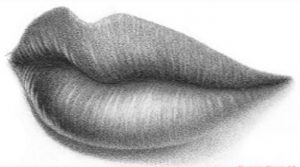
Step 8
Shade. With the HB pencil, use my Shadow-Lining technique to outline the areas you want to highlight or the areas that are shaded. Then shade outside the Shadow Lined areas. Use HB, then 2B, and finally 4B to give depth to your drawing. You can shade into areas you’ve already Shaded or even change it up a bit as you go along. If you want your lips to look glossy, make your highlights as clean as possible and your shine less.
Step 9
Blend it Use a mixing stump to smooth your shadow. Blend using the same motion your contours are flowing. Do not mix from light to dark.
Step 10
Touch. If your highlight is too bold, clamp your kneaded eraser and shape it into a curved shape similar to your contour and press it along the lip area you want to lighten. Continue lightening your highlights or even add softer graphite to darken dark areas like wrinkles, the corners of your mouth, or shadows under your lower lip.
Step 11
Optional. This step is completely optional. But I highly recommend as it can take your artwork to the next level. Depending on your preference, use your left or right hand to navigate down to the share buttons on this page and click on any of the social media platforms to share this awesome tutorial with your friends. friend! If you like my way of teaching and want to see more tutorials on a regular basis, please share so I can keep doing what I do.
Thanks for your support! 🙂 Would you like to share your 3/4 lip drawing with me and other RFA readers? Submit your artwork via my facebook page and I’ll post it in the gallery! How many attempts did it take you to successfully draw lips in 3/4 view? Which step do you have the most difficulty with? Let me know in the comments below!


