How To Draw Jesus on the Cross easy with this how-to video and step-by-step drawing instructions. How to draw step by step for beginners and everyone.
Please see the drawing tutorial in the video below
You can refer to the simple step-by-step drawing guide below
Step 1
To start this tutorial on how to draw Jesus on the cross, we’ll start with the cross itself.
To draw a cross, you can use a ruler to draw straight lines, but we strongly recommend drawing it freehand.
The reason we’d recommend this is that it looks a bit more like it’s made of wood if the lines aren’t perfectly straight.
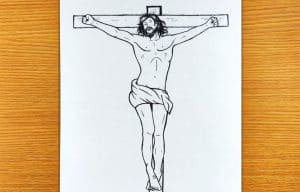
However, you end up drawing straight lines, you can draw most of the crosses now. Be sure to refer to the reference image and leave some gaps where we did, as we’ll be drawing Jesus in those gaps soon.
We will also draw a banner with INRI written on it near the top of the cross.
Step 2 – Draw the head and arms for Jesus
We will start and arm Jesus in this step of your Jesus on the drawing of the cross.
These will be some of the more difficult aspects of this drawing, as drawing the actual features and proportions can be a bit tricky.
To make things easier, you can draw some basic shapes with a light pencil and then add some details on top of them.
We will draw his long hair with some wavy lines, and the crown of thorns will also be around his head. His bearded face will be slightly sunken, and then we’ll draw his arms hanging loosely.
They will also be nailed to the arms of the cross, as shown in the reference image.
Step 3 – Next, draw his chest in this step
For this third step of the tutorial on how to draw Jesus on the cross, we will be adding his chest.
The chest will be quite detailed, and these details will be drawn with lots of curves to show his muscular and skeletal structure.
This part of the body can also be quite difficult to do precisely, so do your best to reproduce the picture as it appears in our reference image.
The chest will connect naturally with the base of the arms and shoulders, and in the next step we will draw his waist and the torn clothes he is wearing.
Step 4 – Now draw the starting point of his waist and legs
As we mentioned in the previous step about your Jesus on the drawing of the cross, we will start with the belt and legs in this section. To start this off, we’ll first draw the rags he’s wearing.
These scraps of fabric will be drawn with some more curved lines joined together to create the shape of the fabric.
Then we’ll draw the top of his leg with the same lines we used for his chest and arms. These lines will again help build muscle and form of the leg.
After they are drawn, we will complete the pins in the next section.
Step 5 – Add some final details about your Jesus on the drawing of the cross
This step of our drawing Jesus on the cross tutorial will help you perfect the final details and elements so you are ready for the final step.
To do this, we will lengthen the legs from the sections you drew in the previous step.
The legs will be pretty close together, and his feet will also be nailed to the cross, as shown in the picture.
After these details are drawn, you will complete this really powerful picture. In the next section, we’ll finish it off with some color.
Step 6 – Complete your drawing of Jesus on the cross with some colors
Now it’s time to finish this drawing of Jesus on the cross by adding some color to it. In our reference image, we kept the colors a bit darker and more muted to match the overcast tones of the scene.
If you like this color approach, you can achieve similar results by using lighter mediums like watercolors and crayons for softer tones.
It would also be quite striking to use brighter colors to focus on the more hopeful message of the event, so it really depends on what kind of mood you want for it.
What colors and art mediums do you think are best suited to this important painting?


