How To Draw a Tree Of Life easy with this how-to video and step-by-step drawing instructions. Tree Drawing tutorial for beginners and kids.
Please see the drawing tutorial in the video below
You can refer to the simple step-by-step drawing guide below
Step 1
To start this tutorial on how to draw the tree of life, we will start with the bark of the tree.
We’re going to make the tree pretty zigzag and pointed, so we’ll use lots of bends and twists to create the trunk and branches.
The branches will stick out from the top of the tree in all directions, and they will all be quite wavy and bent.
The central branch at the top will also have a curved shape at its base. Once you have recreated all of these aspects as they appear in the reference image, you can move on to step 2!
Step 2 – Next, draw some details for the bark
For the second part of your drawing of the tree of life, we will add more detail to the bark and branches to make the tree look a little more old and weathered.
To do this, we will draw multiple curves onto the tree, some curving inward into some curvilinear shapes.
You can also extend the lines from the ends of the branches to add some twigs and twigs sticking out.
Once you are satisfied with the way these details look, we can move on to the next section where we will learn about the roots.
Step 3 – Draw some roots for the tree
This step of our tree of life tutorial can be a bit tricky, as we will be drawing a lot of roots underneath the tree.
This is a step that might look harder than it actually is, as we’ll be taking it nice and slow!
Each root will emerge individually from the base of the tree, and each root will have a thicker tip before branching into many smaller root branches.
For this design, we will create 5 or 6 of these roots, with each root branching into many smaller roots.
If you take it slow and follow the reference image then you will easily recreate this aspect!
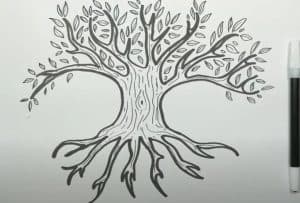
Step 4 – Next, add some details to the branches and roots
For your tree of life drawing, we will try to make it look as complete as possible. For that reason, we will draw more details on the branches and roots.
For the branches, add some curves and waves to each spike.
We’ll do a similar idea for the roots, where we’ll draw some more straight lines poking out the existing roots.
Once you’ve done that, we can start adding details and final touches to your painting, so let’s move on to step 5!
Step 5 – Finalize the leaves of your tree of life drawing
Without the healthy leaf tips, this plant would look rather dead, and this defeats the point of view of the tree of life a bit.
That is why we will draw that aspect along with some final strokes in this fifth step of the tutorial on how to draw the tree of life.
To do this, we will draw a border around all the branches for the tree to create that foliage.
The outline of this border will be quite twisted and wavy, as this will help it look more dynamic.
Once you’ve drawn the foliage, you’re ready to take the final step! Before you do, you can also add some details of your own.
These can be as small as leaves or fruit falling from a tree or as large as the sun in the background. It’s up to you, so have fun with it as you show your creativity!
Step 6 – Complete your tree of life drawing with some colors
This image is usually spherical, so we’ll do it with color for this final part of your tree of life drawing.
You can use a drawing compass with your crayon or pencil to create a perfect circle around the tree as it appears in our reference image.
We then used brown and green for the bark and leaves along with some pretty cool blues for the background.
This is what we’ve chosen, but feel free to use any colors, art media, and other tools you love for this image. Color can help set the mood for a painting a lot, so let your creativity guide you as you finish the picture!


![How to Draw a Cat [Narrated Step-by-Step Tutorial]](https://htdraw.com/wp-content/uploads/2018/05/How-to-Draw-a-Cat-Step-by-Step-Tutorial-370x297.jpg "How to Draw a Cat [Narrated Step-by-Step Tutorial]")