How to draw a papaya tree easy with this how-to video and step-by-step drawing instructions. How to draw a tree for beginners and kids.
Please see the drawing tutorial in the video below
You can refer to the simple step-by-step drawing guide below
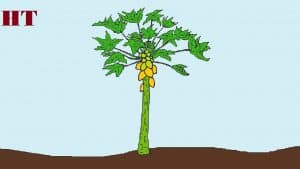
Step 1
First, draw the trunk. Draw a line going up but leave a small gap upwards. Draw another line a little bit away from your last line but make it a bit wavy and leave a small gap a little lower than the line you left in your other line.
Step 2
Next, draw the trunk details. At the bottom of the tree, draw a V V line that deviates to one side and opens to the right. Draw another side VNH above that, but open it to the left. Continue alternating V VNH round up the middle of the trunk.
Step 3
Now, draw the roots. Draw about four small paths off the bottom of the trunk in all directions.
Step 4
Then draw the branches. Where you left a small gap on the left of the trunk, draw a slanting line on the left side on the left of the opening. Do the same with the gaps you left on the right of your trunk but this time make the lines slant to the right. Draw about three small oblique lines along the inside of your branches.
Step 5
Now, draw the leaf. From the right branch, draw a dot with about seven lines coming from all directions. At the end of each line, draw six spikes that all connect in between. Repeat these steps at the end of all your branches for as many leaves as you want.
Step 6
Finally, draw the papaya. At the end of your middle branch, draw a small line going down. From that line draw a large oval with the curve slightly up and down the middle. This is your papaya.
Step 7
Coloring papaya trees, light green stems, green leaves, papayas when young, green, ripe yellow.


 Step by Step")


Where are the drawings