How to Draw a Hockey Player easy with this how-to video and step-by-step drawing instructions. Drawing jobs tutorial for beginners and everyone.
Please see the drawing tutorial in the video below
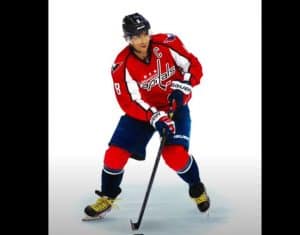
You can refer to the simple step-by-step drawing guide below
Step 1
We start drawing with a pretty standard step – from the fact that we’ll be drawing the skeleton of our character. First of all, we outline the head and the straight lines of the spine, outlining the arms and legs. As you may have noticed, we drew the hockey player a little bit inclined to convey the dynamics of his movement. By the way, don’t forget that the first three steps should be drawn with very light lines.
Step 2
Now we need to make our character richer. First outline the outline of the neck and body. Then we sketch the arms and legs with simple geometric shapes, such as circles and cylinders. In the same step we’ll draw two lines on top, with its help in the future we’ll draw the details of the face. As in the previous step, use very light lines.
Step 3
We continue to use very light lines. Here we will add the most basic details. Starting with the head, let’s outline the contours of the face and helmet details. Next, outline the outer clothes with the giant shoulders. Please note that the hockey player’s clothes must be very large and large. In the same step we will outline a hockey stick and skates.
Step 4
Starting with this step, we will use clear and dark lines to draw the hockey player details. Let’s start with the head, neatly drawing the contours of a round helmet. Next, draw the contours of the eyes, nose, eyebrows, and mouth. At the end of this step we draw out the contours of the face and remove the unnecessary guide lines from the head.
Step 5
So now let’s move on to the hockey player’s torso. This step will be quite simple. Using clear and light bold lines, carefully draw the outlines of the garment above, draw all the lines and creases, like in our example. Note that the folds should be in areas of compression and stretching of tissue.
Step 6
We continue to draw the upper part of the hockey player. Here, we will need to draw the outlines of the arm using clear and dark lines. First hand drawn large hockey sleeves and gloves. In the hands of the hockey player carefully draw out the hockey stick. By the way, don’t forget to remove all unnecessary instructions from the upper body.
Step 7
The hockey player’s upper body is done, now it’s time to do the lower body. Here, we first draw the outline of the shorts and pants over the shorts. Furthermore, we move lower and carefully draw the outlines of the large skates. Finally, remove all unnecessary instructions from the drawing and move on to the final step of the lesson on how to draw a hockey player.
Step 9
Time to work in the dark. To paint shadows accurately, first visualize where the light is coming from. Next, taking this into account, carefully outline the shadow contours and fill them with brush strokes. For a darker hatch you can add another layer of hatching, and for brighter shadows just use a less dense hatch.
As you may have noticed, this lesson is quite difficult, but at the end of the lesson, we have a realistic drawing of a hockey player. If you want more such drawing lessons, post our forum under the name “Everyone” and subscribe to us on social media so you won’t miss a new lesson from HTDraw.com.


No Responses